


Don’t throw them out just yet.
At the end of a long day, nothing feels better than taking them off, tossing them to the side, and forgetting about them until it’s time to rejoin the world. This neglectful treatment is what leads to their demise, as what was once a thriving head of hair gradually transforms into a dry, matted mess. Before you know it, you’re in the market for a new wig, as the mistreated one becomes the newest addition to the pile of others in the back of your closet that met the same fate, out of sight and mind.

Image Source: iStock
And, if you’re being honest with yourself, this cycle is becoming expensive.
Even though we’re all guilty of mistreating them, wigs are an investment. Keeping them cleansed, hydrated, and properly stored when they’re not on our heads are crucial to preserving their value and prolonging their lifespan. That being said, we don’t always take the proper measures to upkeep them — that’s life.
However, if you think it’s time for you and your wig to part ways, think again. There are methods to resuscitate your abandoned lace front, frontal closure, or whatever your type may be. Just because you didn’t give it the TLC it needed in your early days together doesn’t mean you can’t redeem yourself now!
Consider this your redemption hour — it’s time to bring your old wigs back to life. Here’s how:
1. PATIENCE: Wig rejuvenation takes a lot of time and patience. It took a while for it to get in this condition — it’s going to take time to reverse the damage. It looks bad now, but take a deep breath. It’s going to be OK. With patience and a gentle hand, you’ll slowly transform the hair into how it looked when you first bought it.
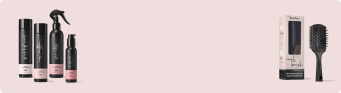
2. CLARIFY: There’s probably a good amount of product build-up and residue in the hair. You’ll need an ultra-clarifying shampoo, like Fresh Kept Secret, to breakdown the excess debris that plays a huge part in the tangling, knots, and shedding that you’re undoubtedly facing at this stage of the game.

Now, this may seem a bit unconventional, but you want to start the detangling process during the shampooing step. You’ll need to arm yourself a good brush to take on this task. We highly recommend the High Definition Curlbrush, a dual-side multitasker that works through the smallest of knots and tangles, making detangling a breeze.

Using the detangling side of the brush, gently begin brushing through the hair. Start at the tips and gradually work your way up to the roots. This is where patience will come into play, as your first instinct may be to rip through the hair to finish this step as quickly as possible. That will only lead to excessive shedding and wasted time — being gentle and moving slowly will spare you of both.
Once you’ve worked through all of the tangles, feel free to begin brushing through the hair a bit more firmly. Continue to do so until you begin to see the hair’s texture come through. Rinse thoroughly.
3. HYDRATE: Once you’ve detangled with your clarifying shampoo, it’s time to pump the moisture back into your hair. You’ll need to apply a hydrating conditioner that increases your hair’s slip and preps it for the next round of detangling. We suggest New Condition — it gives your hair the hydration it needs while also providing the slip necessary to work out the finest tangles and knots.

After you’ve worked the conditioner into your hair, take the defining side of the HD Curlbrush to get through any single-strand knots that may have been left behind in your first detangling pass.
Rinse out the conditioner thoroughly, then add a second application of New Condition and let it sit for a while. Go run some errands, have a snack, and allow the hair to spend some time marinating in the conditioner. Old wigs lack moisture — this step provides it with the hydration it needs to come back to life.
After it’s spent time soaking up moisture (we recommend 2 to 3 hours), brush through it one last time before rinsing it well. The hair should be soft, hydrated, and feeling fresh.
4. STYLE: When it comes to styling your like-new wig, it’s all about applying the right products. The Perfect Extensions Kits by Heat Free Hair include formulas specifically tailored to your hair texture that were designed to bring out the best in your hair. And trust us when we say the right mousse formulation makes a difference in everything from providing the right hydration to preventing that dry, crunchy after effect. No thank you.
Most mousses are too foamy and don’t have enough hydration while others are too watery and don't dry properly. Instead, grab the Curl Whipped Texture Defining Mousse to define your curls and whip them back into shape. The Curl Whipped mousse is specially formulated with bonding properties that create curl definition with oil infusion to define your curls perfectly and dry transparent with hydration and a soft-touch finish. Now we’re talking.
From there, apply the 10-in-1 multitasking serum, Primestyle, for a lightweight sheen that’ll have your hair shining like new.
5. DRY: Once you’ve styled it as desired, allow your wig to dry 1000% before putting it on. This will prevent it from matting and producing a mildewy scent, undoing all of the hard work you’ve just put in. After the hair, weft, and roots totally dry, feel free to install your wig and pat yourself on the back.
You’ve just achieved day 1 hair without spending day 1 money.
With these professional tips, you’ll never need to waste money again. Click here to grab all the products recommended above and start restoring those old wigs (that used to be oh so CUTE) to their former glory - fast.